
Is it safe to remove lead paint yourself? This article looks at the risks and effects of lead paint and how to remove lead paint safely.
How to Remove Lead Paint Safely
To work safely with lead paint, you don't need to hire pricey specialists. A bucket, dustpan, half-mask respirator, approved HEPA vacuum with a HEPA filter, paint scraper, putty knife, rags, and a utility knife are all required.
When capturing and managing dust and removing lead paint, six-mil polyethene plastic and duct tape are a remodel's best allies. Use of them with care at this point substantially facilitates cleaning afterwards.
Spread poly over the floor and use duct tape to thoroughly seal the borders, especially if you have wall-to-wall carpet. Once lead dust has penetrated the carpet, it is very hard to remove.
You might tape the poly to the baseboards, but be cautious that it may tear off the paint when you remove it. If you're working in a tiny space, such as around a single window, poly and tape an area at least 5 feet beyond the work zone's perimeter.
It's best to get rid of as much furniture as possible, including carpets. Close the windows to keep dust from blowing about. Tape off doors and other openings to protect dust and debris from entering the workspace. Long-sleeved shirts, long pants, rubber gloves, and washable shoes are also suggested.
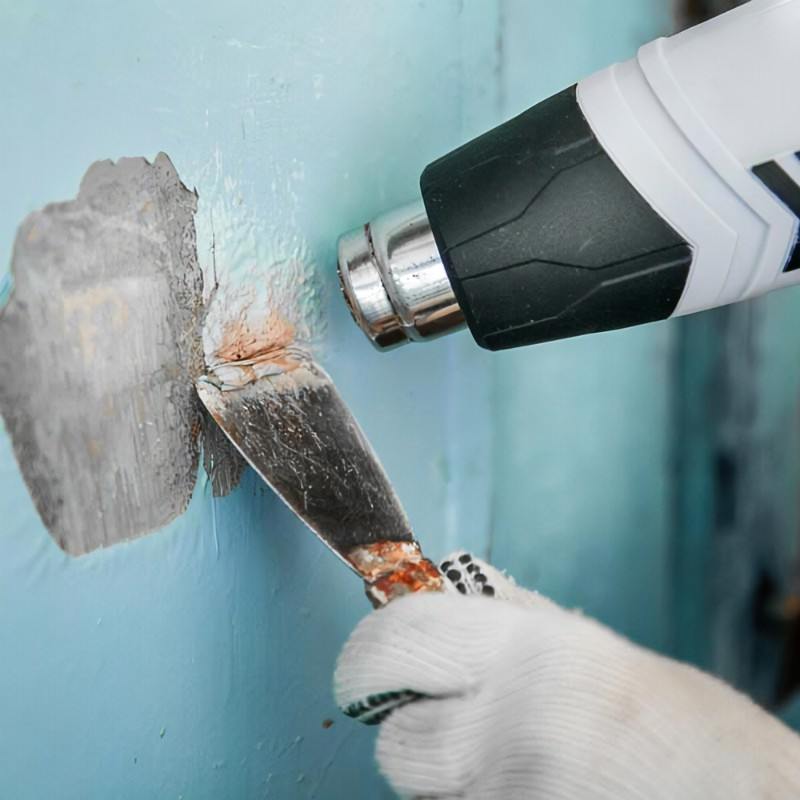
Even though we'll be working wet to reduce dust, breathing protection requires a half-mask respirator with a P100 filter. Wear protective gear such as goggles or glasses to shield your eyes from flying debris. Before touching any painted surface, always spritz it with water using a spray bottle.
Wet down the window stop and any other pieces that need to be removed. When you work wet during lead paint removal, the dust clings to the painted surfaces instead of blowing out in a dangerous cloud.
After scraping, wet-sand chalking or rough regions and smooth chipped areas with a medium- or coarse-grit sanding sponge. The sponge's square sides make it simple to bend and reach into corners.
Wet techniques are used to remove lead paint from the exterior and interior. Keep in mind that only the flaking, loose sections of the paint need to be removed, not the complete coat.
Compare the cost and duration of choices if you want to remove all of the paint. Paint-coated trim and window sashes can be removed and sent to a professional paint remover. The lead is now out of the home. Replace the old wood with fresh new wood, whether it's siding, trim, window sashes, or complete windows, if the cost is prohibitive.
Use an all-purpose cleaner to clean the area, including the adjoining wall. To avoid recontamination clean regions, it is critical to wipe in one direction. To assist with the lead paint removal procedure, start at the top and work your way down.
The goal is to always move the sludge and residue downhill. Rinse the entire project with a clean towel and water, starting at the top and working your way down. Wipe down horizontal surfaces in a single direction. After each wipe, refold the towel to reveal a clean surface. Rinse the cloth in a pail of water and replace the water as needed.
To avoid chipping, score the stop/trim joint with a utility knife. Then pull the stop off and remove the inner sash, splitting stop, and outer sash to remove the paint from the sliding surfaces. It is frequently simpler to replace the parting stop and the stop with fresh wood.
If you employ chemical strippers on your own, make sure to wet-sand the surface afterwards.
Although the wood may appear to be paint-free, the lead residue is frequently present. Begin by using the HEPA vacuum to suck up paint chips and other debris. Gunk gets stuck in crevices, so scrape it out as you go.
Tuck a screwdriver blade inside a towel and rub it over nooks and crevices to get it out. We kept the metal weather-strip in the window trough since it fits snuggly against the sill and the paint on the sill was still in good condition.
If the weather strip is loose or the paint surrounding it is flaking, you must remove it to clean the area thoroughly.
Wet the surface again and scrape away any loose, peeling paint, starting at the top and working your way down. Wipe up the water, sludge, and paint flakes with a cloth (or HEPA vacuums) as needed, squeezing it out into an empty bucket.
Scrape with caution since wet wood is more prone to gouging than dry wood. Scrape window stools and "troughs," or the exposed sill below the window sash, since moisture and sunshine can cause chipping and peeling.

After scraping, wet-sand chalking or rough regions and smooth chipped areas with a medium- or coarse-grit sanding sponge. The sponge's square sides make it simple to bend and reach into corners. Wet techniques are used to remove lead paint from the exterior and interior.
Keep in mind that only the flaking, loose sections of the paint need to be removed, not the complete coat. Compare the cost and duration of choices if you want to remove all of the paint. Paint-coated trim and window sashes can be removed and sent to a professional paint remover. The lead is now out of the home. Replace the old wood with fresh new wood, whether it's siding, trim, window sashes, or complete windows, if the cost is prohibitive.
Use an all-purpose cleaner to clean the area, including the adjoining wall. To avoid recontamination clean regions, it is critical to wipe in one direction.
To assist with the lead paint removal procedure, start at the top and work your way down. The goal is to always move the sludge and residue downhill. Rinse the entire project with a clean towel and water, starting at the top and working your way down. Wipe down horizontal surfaces in a single direction.
After each wipe, refold the towel to reveal a clean surface. Rinse the cloth in a pail of water and replace the water as needed.
We recommend finishing the complete clean up before repainting to reduce the danger of polluting neighbouring rooms.
First, remove the poly. Using a spray bottle, wet down the contaminated surfaces of the plastic. The goal is to keep all contaminated sides toward the centre of the floor by removing the topmost poly first, above the door, and folding it inward.
Vacuum the floor with a HEPA vacuum, paying special attention to corners and edges. Be very thorough on ancient wood floors with plenty of dust-gathering fissures. Using an all-purpose cleaner and a cloth, clean the floor.
Reduce the possibility of recontamination by repositioning the cloth such that the dirty edge is always on the leading edge. Wring it out and shake the paint chips into a separate pail. Change the water often. Then, using the same approach, rinse.
For home improvement, our experience and newsletters provide the right information that helps solve your questions and issues. In addition, we are here at all times of the day to help people deal with their lead containing products and homes quicker. It's within your rights to have your homes updated and found free of lead.
Our years of easily recommended tips are inexpensive to charge and provide the safest options to follow if things turn bad. Depending on your comfort with lead, feel free to send us your issues - our experience has only continued to grow, and we make sure to leave your homes lead-free.
Our reliable and informational videos provide any tips and support you need. If you are unsure, we provide lots of tests that can help you in protecting friends, loved ones and younger children from the dangers of lead paint - you can also use sheeting to cover up any lead exposure.
Similarly, if children younger than 5 have chewed on lead, make sure to look out for any symptoms of lead poisoning if you have recently called your home into a stage of remodelling.
When lead paint has been sanded, make sure to wear a mask so that no dust is inhaled from the plaster. If you're attempting to DIY the lead removal, make sure to use the appropriate woodwork materials.
Additionally, throw away and dispose of any dust-covered clothes once the lead-removal process has been completed. When you carry out this process and follow our instructions, it's good to dispose of any clothing that has come in contact with lead dust once the process is finished.
When dealing with a home built with walls that contain lead, one essential step in the work area is to safely remove and cover up any other woodwork and rugs. When peeling the walls, make sure to simply wipe them down with warm water before using a hand scraper.
When removing lead from your site, make sure to take safety precautions and wear safety gear such as protective goggles. Wearing protective clothing limits your exposure to anything that may contain lead paint and can create dust.
When dealing with lead exposure and lead particles from flaking paint or existing paint, make sure to use a certified HEPA vacuum on the entire floor and skirting boards so that no particles can escape.
Sanding sponges, heat guns, and plastic sheeting are all needed when stripping paint from any rough areas. When using a paint stripper, make sure to empty it into the garbage bag so that no paint particles can cause damage. Lead based paint is extremely hazardous - make sure when you strip lead paint, chipped or peeling paint to put it straight in the bin.
About Lead Paint
Lead poisoning is a huge public health concern, and the primary source of that lead is dust from disintegrating lead paint. Lead poisoning is more likely in houses built before 1978, when lead was banned in household paints.
It is caused by flaking, peeling, chipping, chalking paint, and dust from a renovation project. With lead paint removal strategies and a few easy steps, you can control the dust and keep your home lead-safe and worry-free.
We'll show you safe dust management procedures utilized effectively by lead reduction professionals in this lead paint removal article. When renovating, remodelling, repairing, or otherwise disturbing lead paint, use them.
The three basic techniques - control the dust, work wet, and thoroughly clean up - will appear cumbersome and slow at first. They are, however, little more than the standard dust management techniques that you would anticipate from any first-rate painters and remodels. Once you've become used to them, you'll see they're pretty much common sense ways. If you have lead paint in your house, ask any contractors you employ if they utilize lead-safe dust management procedures.
Our published page provides the content you need to ensure a perfect plan. Our step-by-step instructions are there to be applied so that you can vaporize any lead-based substances when redecorating - it's important to learn the dangers lead can cause within your living areas; therefore, our comments and pages run fully-functional guides on how to make sure no lead is left in your area. Fireplaces tend to use lead paint when coating; this means that brands purchase and use this harmful substance on their finished products - typically on cast-iron fireplaces. If you're thinking of a fireplace pickup, make sure to check for and confirm any traces of lead paint; our team members can run lead checks, approximately at times that suit you.
The Risks and Effects of Lead Paint
Lead has been recognized to be toxic for over a century, but it remained legal to use in the United Kingdom until 1992. Between 1963 and 1992, the use of lead paint was only permitted in historic structures, therefore, the incidence of usage declined in most scenarios beginning in the mid-1960s.
Lead was utilized as a pigment in paintings. Lead is neurotoxic that accumulates in the body's organs and damages them all, notably the neurological systems.
It enters the body via breathed or eaten particles and accumulates in the organs. The consequences are especially severe in new-borns and children since their bodies are growing and absorbed at a much higher pace. Toxins can be passed from pregnant mothers to their foetuses, where they are absorbed more quickly and have more harmful consequences.
Aside from eating peeling paint, the second major concern is breathing or ingesting lead-laden dust common in ancient buildings, particularly on the flooring. When lead paints are scraped or burned off, high quantities of lead can be absorbed by inhaling dust or fumes.
If you become unwell, lose your appetite, or develop sleeplessness as a result of excessive lead paint exposure, you should seek medical attention. Don't take any chances - the easiest way to avoid exposure is to avoid it altogether.
Despite being aware of the risks of lead paints, their usage persisted, and the quantity of lead climbed to a peak of roughly 50% between 1930 and 1955. This implies that, while Victorian properties are likely to have the greatest concentrations of lead, some post-war homes may have considerable and hazardous amounts of lead paint.
According to medical data, children's health can be severely harmed as a result of lead poisoning. Lead poisoning affects the brain and central nervous system at large doses, resulting in lethargy, convulsions, and even death. Children who have been exposed to high levels of lead may have cognitive and behavioural issues.
At low levels of exposure that create no evident symptoms, lead is now recognized to induce a variety of consequences across numerous physiological systems.
This collected data can help you secure your child's exposure to lead and stop lead from seeping into their bodies. Older houses on the market - depending on your location - tend to have layers of lead paint; if this is the case, make sure to use protective equipment when softening and removing the paint. We advise you to take note of this data when looking to buy or rent this type of house.
If you suspect that lead has been ingested, consult your doctor and make sure that sufficient tests are conducted on your property. Discovering hazards such as lead is imperative in older houses. Our page provides the best way to unveil lead.
Lead in a pregnant woman's blood can readily pass the placenta to the foetus if she is exposed to it. As a result, her child may be delivered prematurely or with low birth weight. Even low lead levels in a new born can cause behavioural and developmental issues.
A pregnant woman's risk of miscarriage is also increased by high lead blood levels. The best and safest way to avoid this is to hire an all purpose cleaner to clean up any rough areas caused by the lead removal job, as well as seek professional advice from your doctor.
How to deal with Lead Paint
Lead paint is a fairly frequent problem that many homeowners confront, especially if you live in an older house, but it's not all awful, and we're going to tell you precisely what to do if you find lead paint in your home. First and foremost, determine whether your paint includes lead. If you reside in a home constructed before 1960, lead paint was most likely utilized.
Lead paint testing kits are available to determine whether or not your paint contains lead. If you want to be certain that you don't have lead paint, you should get a professional check done by a business-like Lead Paint Safety Association or Lead Test Home Analysis Service.
What to do if you have Lead Paint?
Even if you've tested positive for lead paint, there's no need to panic. Only if the paint is faulty is there a risk to your health. If it's in good shape with no flaking, removing it poses a higher risk of lead dust exposure.
Only cure or remove old lead paint surfaces if the paint is flaking or peeling, or if dust particles are present. If your paint is in excellent condition, it's advisable to cover and seal the lead paint. Before repainting, if the paint is in poor condition, such as flaking, peeling, or losing adhesion, it must be removed.
When washing clothing, lead may only be cleaned if the detergent has a surfactant, which is not found in organic or natural detergents. In this case, you'll have to compromise and buy a generic detergent containing a surfactant.
Use a phosphate-rich detergent to guarantee that no lead particles are left in the machine, which might contaminate further garments. Doing this is safe for all the family and ensures that no lead gets through the gaps in your clothes.
Make sure to put any lead-dusted clothing in the wash separately so that it doesn't run the risk of it covering and being trapped in other pieces of clothing. Do this by rolling that clothing in a bag, shutting it and throwing it in the washing machine - this is an efficient way to make sure that no lead dust remains when you decide to wear those garments.
How to Identify Lead Paint
If you reside in a house constructed before 1978, we recommend following these methods when removing paint for remodelling, repainting, or making repairs, unless you know the surfaces are free of lead.
The majority of homes constructed before 1950 have lead paint. If your house was built between 1950 and 1978, it may or may not have been painted with lead paint.
A lab study of paint chips is the best technique to examine the surfaces you want to disrupt. A public health centre will instruct you on how to collect and deliver samples. Chemical lead test kits supplied in paint stores are not completely trustworthy. A professional lead examination will cost a few hundred pounds.
If you require lead paint removal, we offer blast cleaning in London or anywhere in the UK.
If you are interested in a dustless blasting service, follow the link below to find out more.